Maximizing Efficiency: Tips for Streamlining Customer Management in VODO
To add a new customer to VODO, you can follow these steps:

- Access your VODO account by visiting the website and logging in. Alternatively, use this link for quick access to the login page.
- Navigate to the company where you want to add a new customer by clicking on its name.
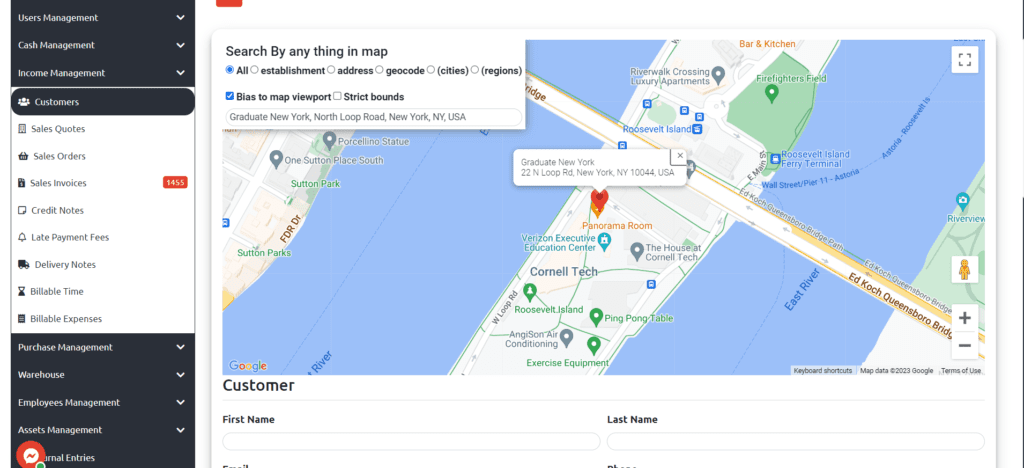
- Select Income Management from the side menu, followed by Customers and New Customer to access the form for adding a new customer.
- If you have activated the location feature through Google Maps from the settings, you must choose the customer’s location by specifying it via Google Maps. In this case, the VODO system will print the address directly.
- Enter the customer’s first and last name in the “Customer name” field. This is the data of the account manager responsible for managing your relationship with your customer.
- Enter the customer’s email in the “E-mail” field. This is the email address where the system will send all important data.
- Fill in the “Customer’s phone” field with the customer’s phone number preceded by the country code, or choose the customer’s country, and the code will be determined through the VODO system.
- Add the official name of the company listed in government records in the “Company Name” field. Ensure that the company name is correct as it cannot be changed.
- Add the customer’s tax number in the “Tax number” field, which will appear in the billing process. In the event that you do not have the tax number for the customer, click on the “I acknowledge that I do not have a tax number” button.
- You can set and confirm a password in the “Password” field, through which the customer will be able to enter the VODO system to follow up on his bills, transactions, and purchases, etc.
- Add the main address for the customer and a sub-address in the “Addresses” field, and also choose the country, city, zip code, province and province.
- Choose the currency from the drop-down list that you previously managed from the settings in the “Currency” field.
- Add the customer’s commercial registration number in the “Business ID” field.
- Add the address to which invoices will be issued in the “Billing Address” field.
- Add the address to which orders or services will be delivered in the “Delivery Address” field.
- Set the maximum number of unpaid purchases or amount of debt you may owe at a given time in the “Credit Limit” field. The value of this debt includes unpaid purchases of products. Where the customer can purchase goods without paying according to the amount of the credit limit.
There is no limit to the number of customers you can add to VODO. However, you may need to upgrade your VODO subscription if you exceed the number of customers included in your current plan.
Yes, you can edit a customer’s information at any time by going to the “Customers” in the side panel and selecting or searching for the customer you want to edit. However, it’s important to note that the extent to which you can edit a customer’s information may be limited depending on the type of information you are trying to change.
For example, you may be able to edit basic information such as the customer’s name, phone number, or email address. However, some elements such as the VAT number, company name, or other legally mandated information may not be editable without proper authorization or documentation.
It’s always important to double-check any changes you make to a customer’s information and ensure that they are accurate and up-to-date. This can help to prevent errors, confusion, or legal issues down the line.
You need to have administrative access to your VODO account to add new customers.
You will need the customer’s name, email, and address to add them to your VODO account. You can also add additional information such as phone number, date of birth, and billing information if necessary.
The new customer will be added to your VODO account and will have access to the services you have enabled for their account. They will receive a welcome email with instructions on how to access their account and use the services you have provided.
Yes, customers can easily create their own VODO accounts belonging to your business by visiting your website (powered by VODO) and signing up for an account. Our user-friendly interface makes the process simple and straightforward.
When a customer creates their own account, they will have access to all the features and services you have enabled for their account, and they will be able to manage their own preferences and settings. This gives them the freedom and flexibility to personalize their experience with your business.
However, if you prefer to add a customer directly, you can do so from your business account dashboard. This means that you can quickly grant access to services and features without requiring the customer to sign up themselves.
Either way, VODO makes it easy for you to manage or add a new customer account and provide them with the best possible experience. Whether they create their own account or you add them directly, your customers will have seamless access to the services they need.
If you’re having trouble with the “add a new customer account”, don’t worry – help is available. Simply reach out to VODO’s technical support team for assistance.
You can contact our team directly through WhatsApp, where we are available to answer your questions for “add a new customer “and provide support in real-time. Alternatively, you can also get in touch with us through the Contact Us page on our website, and we will get back to you as soon as possible.

